About a year ago, I updated on Roland’s bug fixes on the SC VA. Every ‘midi’ parameters of the SC VA are accessible via System Exclusive (SysEx) message which is an old school/cryptic communication protocol in hexadecimal format. With the advent of the current DAW, users no longer need to rely on the SysEx as one can achieve the same with either visual editing on the VST instrument or using Automation.
Unfortunately up till the latest SC VA plug-in, Roland still refuses to make the four parameters on EFX Control Switches (ECS) available via Automation, which is a shame really. Without activating the ECS, one will not be able to realize the full potential of the SC VA. What do I mean by this? As you know from the SC-88Pro model onwards, the inclusion of the Insertion Effects (EFX) can elevate the Sound Canvas PCM’s playback to the next level.
Applying any of the Tones through an EFX will rejuvenate the sound. A static or fixed EFX will produce one basic level of tone modification. This is what’s available on everyone’s SC VA at the moment.
For a more complex tone modification you will need dynamic EFX parameters which are manipulated in realtime via the ECS. Since the SC VA manufacturer refuses to offer Automation manipulation for these four ECS, we can still do it but have to turn to SysEx to activate it – but you only need to do this ‘hack’ once!
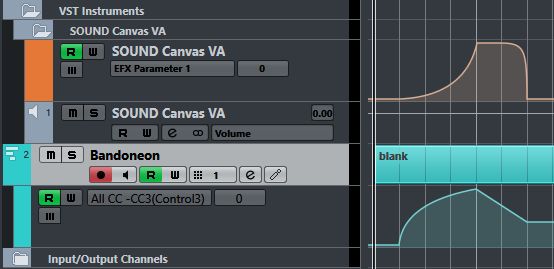
With your SC VA plug in already loaded in a new Project file, you open the Key Editor. At the bottom of the Key Editor window, Velocity is usually the default Controller in view. You change this part of Controller Selection & Functions to System Exclusive and use the Draw (pencil) Tool to open a new SysEx packet at the start of Measure 1 which you’ll see in yellow.
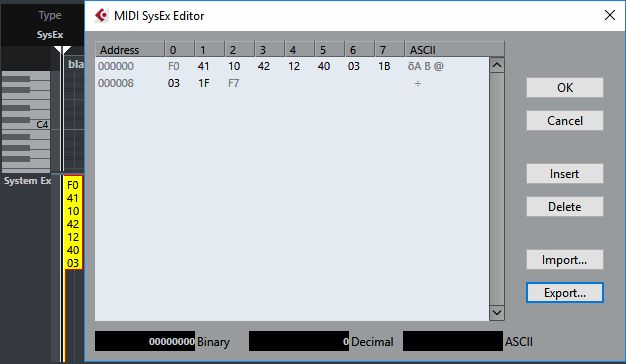
Now change back to the Object selection tool & double click on this yellow packet to access the MIDI SysEx Editor (as shown above). Its header will always start with F0(numeric zero) while the footer will end as F7. You’ll need to populate between these codes with some SysEx commands by inserting the following (in red):
Effect Control Source 1
F0 41 10 42 12 40 03 1B 03 1F F7
ECS1 turned on & assigned to Controller Change #3
Now repeat the same by creating these three more SysEx messages on the next three beats on the same track:
Effect Control Depth 1
F0 41 10 42 12 40 03 1C 7F 22 F7
ECD1 parameter range set to 100% positive
Effect Control Source 2
FO 41 10 42 12 40 03 1D 09 17 F7
ECS2 turned on & assigned to Controller Change #9
Effect Control Depth 2
FO 41 10 42 12 40 03 1E 7F 20 F7
ECD2 parameter range set to 100% positive
After you have done all the above, allow a playback of your DAW once through the entire measure with all these SysEx messages. When this is done, that single SC VA plug-in on your current project would have its ECS activated (hooray!). The setting is temporary though & it will remain on as long as you do not perform a GS MIDI Reset.
Now it is best to save your SC VA preset so that this ECS activation can be recalled when opening additional SC VA instances or when starting another project. You may also discard the original Project file with the SysEx as it’s no longer needed. What we have done here was to turn on both the EFX Control Switches (i.e activated) so that the user can now manipulate the parameters (that is if they want!) within their full range using controller changes #3 & #9 via Automation.
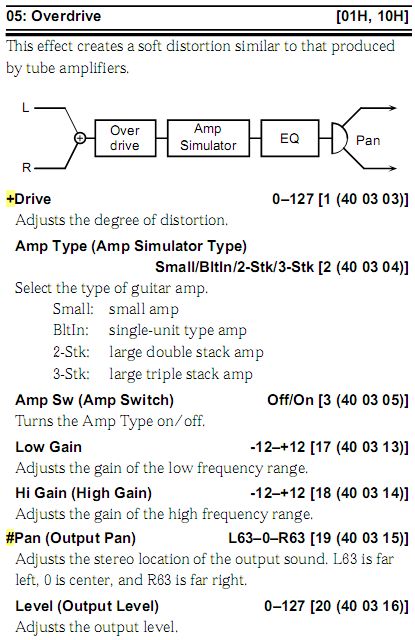
Let’s say we have selected the above EFX 05 (Overdrive) as an example based on either the SC-8820 or SC-8850 owner’s manual. Notice the additional character “+” & “#” before Drive and Pan (Output Pan) which are modifiable with Control Source 1 & 2. Hence CC#3 will modify the “+” (distortion) parameter whereas CC#9 will modify the “#” (panning) parameter. [The SC VA Manual does not have these extra character info though]
Important to take note: The resultant modification is the summation of the initial value of the parameter + input of the controller change. Because the range value lies between 0 & 127, anything that sums up above 127 will remain as 127.
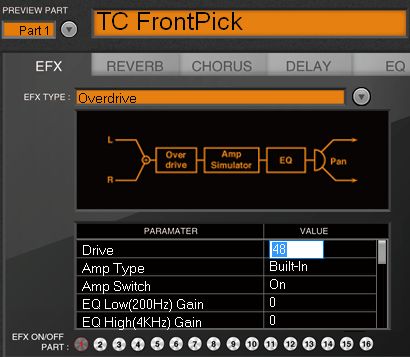
As can be seen from the above screenshot, the initial value of Drive was defaulted to 48 meaning that CC#3 manipulation can only increase the Drive value from 48 upwards. Unfortunately it cannot be lower than 48. So to allow for maximum range, you would need to set the initial value of Drive = 0 from the VST panel. Likewise, you’ll need to reset the EFX Pan to L63 initially on the VST panel & then set the CC#9 automation to start from a mid point value for Center panning.
If you have an external MIDI controller with sliders, you can map two of its sliders to CC#3 & CC#9 so that manipulation of the EFX parameters can be automated in realtime. Alternatively you can also achieve the same with the more refined Automation drawing curves within Cubase.
Now that we can access the ECS, our Sound Canvas VA has once again regained it’s glory & achieved full capability fruition in 2018. People can start creating amazing stuff with it from now on……let’s hear it then!

Can any of the text on the display be changed at all?
LikeLike
Yes but only on the real hardware models via SySex
LikeLike