Noisy output on multiple SC-VA remedy

The Sound Canvas VA uses the same emulated pre-amp circuitry of the late 1990’s from the original hardware. As a result, the moment you have more than one SC-VA plug-in instances routed to an output bus, a measurable noise floor will be observable into Cubase’s mixing bus. Back in the late 1990’s, this would have been acceptable via an analog mixer as such a level was too weak to be detected by our ears.

However if you keep on adding more of the same plug-ins, the noise level will eventually add up & become audible as shown on this table below:

Number of active SC-VA instances Main output (dB)
1 Infinity
2 -84.5
3 -81.0
4 -78.5
5 -76.5
6 -75.0
7 -73.6
8 -72.5
97 -50.8

From a purist perpective, the SC-VA through it’s true ’emulation’ of the original SC-8820 retained the same electronic components of its glory days, resulting in the noisy output. Measurably you would get a similar (or perhaps even worse) if using the analog line outs from the actual hardware!

97 Sound Canvas plug-ins is the highest number of instances used for my Project Behemoth. Compared to today’s standard virtual instrument setup, this noise floor at -50db is considered quite noisy, but it is to be expected since almost 100 analog signals are mixed into the Cubase.

A very quick solution to produce absolute silence (i.e minus infinity dB) when there is no sound activity on my Project Behemoth is by turning on the Noise Gate on the output channel strip of your Mix Console. Set the Threshold to slightly higher than the noise floor, e.g -48dB.

Noise Gate

In the next posting, I will share the optimum gain staging configuration on multiple SC-VAs, so that the overall output will be loud enough without clipping during playback on all 1500+ instruments but still having adequate headroom for final mixing.

Activating the EFX Control Switches

About a year ago, I updated on Roland’s bug fixes on the SC VA. Every ‘midi’ parameters of the SC VA are accessible via System Exclusive (SysEx) message which is an old school/cryptic communication protocol in hexadecimal format. With the advent of the current DAW, users no longer need to rely on the SysEx as one can achieve the same with either visual editing on the VST instrument or using Automation.

Automation

Unfortunately up till the latest SC VA plug-in, Roland still refuses to make the four parameters on EFX Control Switches (ECS) available via Automation, which is a shame really. Without activating the ECS, one will not be able to realize the full potential of the SC VA. What do I mean by this? As you know from the SC-88Pro model onwards, the inclusion of the Insertion Effects (EFX) can elevate the Sound Canvas PCM’s playback to the next level.

Applying any of the Tones through an EFX will rejuvenate the sound. A static or fixed EFX will produce one basic level of tone modification. This is what’s available on everyone’s SC VA at the moment.

For a more complex tone modification you will need dynamic EFX parameters which are manipulated in realtime via the ECS. Since the SC VA manufacturer refuses to offer Automation manipulation for these four ECS, we can still do it but have to turn to SysEx to activate it – but you only need to do this ‘hack’ once!

SysEx

With your SC VA plug in already loaded in a new Project file, you open the Key Editor. At the bottom of the Key Editor window, Velocity is usually the default Controller in view. You change this part of Controller Selection & Functions to System Exclusive and use the Draw (pencil) Tool to open a new SysEx packet at the start of Measure 1 which you’ll see in yellow.

Now change back to the Object selection tool & double click on this yellow packet to access the MIDI SysEx Editor (as shown above). Its header will always start with F0(numeric zero) while the footer will end as F7. You’ll need to populate between these codes with some SysEx commands by inserting the following (in red):

Effect Control Source 1
F0 41 10 42 12 40 03 1B 03 1F F7
ECS1 turned on & assigned to Controller Change #3

Now repeat the same by creating these three more SysEx messages on the next three beats on the same track:

Effect Control Depth 1
F0 41 10 42 12 40 03 1C 7F 22 F7
ECD1 parameter range set to 100% positive

Effect Control Source 2
FO 41 10 42 12 40 03 1D 09 17 F7
ECS2 turned on & assigned to Controller Change #9

Effect Control Depth 2
FO 41 10 42 12 40 03 1E 7F 20 F7
ECD2 parameter range set to 100% positive

After you have done all the above, allow a playback of your DAW once through the entire measure with all these SysEx messages. When this is done, that single SC VA plug-in on your current project would have its ECS activated (hooray!). The setting is temporary though & it will remain on as long as you do not perform a GS MIDI Reset.

Now it is best to save your SC VA preset so that this ECS activation can be recalled when opening additional SC VA instances or when starting another project. You may also discard the original Project file with the SysEx as it’s no longer needed. What we have done here was to turn on both the EFX Control Switches (i.e activated) so that the user can now manipulate the parameters (that is if they want!) within their full range using controller changes #3 & #9 via Automation.

Overdrive EFX

Let’s say we have selected the above EFX 05 (Overdrive) as an example based on either the SC-8820 or SC-8850 owner’s manual. Notice the additional character “+” & “#” before Drive and Pan (Output Pan) which are modifiable with Control Source 1 & 2. Hence CC#3 will modify the “+” (distortion) parameter whereas CC#9 will modify the “#” (panning) parameter. [The SC VA Manual does not have these extra character info though]

Important to take note: The resultant modification is the summation of the initial value of the parameter + input of the controller change. Because the range value lies between 0 & 127, anything that sums up above 127 will remain as 127.

EFX visual parameters

As can be seen from the above screenshot, the initial value of Drive was defaulted to 48 meaning that CC#3 manipulation can only increase the Drive value from 48 upwards. Unfortunately it cannot be lower than 48. So to allow for maximum range, you would need to set the initial value of Drive = 0 from the VST panel. Likewise, you’ll need to reset the EFX Pan to L63 initially on the VST panel & then set the CC#9 automation to start from a mid point value for Center panning.

If you have an external MIDI controller with sliders, you can map two of its sliders to CC#3 & CC#9 so that manipulation of the EFX parameters can be automated in realtime. Alternatively you can also achieve the same with the more refined Automation drawing curves within Cubase.

Now that we can access the ECS, our Sound Canvas VA has once again regained it’s glory & achieved full capability fruition in 2018. People can start creating amazing stuff with it from now on……let’s hear it then!

Emulating JV sounds from the SC VA?

Is it possible for a Sound Canvas to produce the familiar JV type patches? Yes, after some experimentation, I was able to do it on the SC VA! In fact you can achieve this on any of the later SC hardware models which came with Insertion Effects.

The Super JV-1080 rack module came out in 1994 while the first SC module with insertion effects, the SC-88 Pro, was released a year or two later. Their hardware technology inside were from the similar mid-90’s era, making it possible for the 88 Pro to emulate the JV using the front panel editing.

Patch vs Tone

What made the 88 Pro different from the rest of the Sound Canvas series was the availability of 128 Preset Patch + 16 User (programmable) Patch. Essentially a Patch is a combination of one or two Tones together with an Insertion Effect. Even though these patch feature was no longer available on subsequent models (8820, 8850, SC VA), I will show you that it is still accessible in a limited manner via a modified hack.

Here are some of the presets patch as listed on the SC-88 Pro manual:

No.     Patch Name        Instruments                              Effect Type
001     RB STRAT            Clean Gt.                                     48:GTR Multi 1
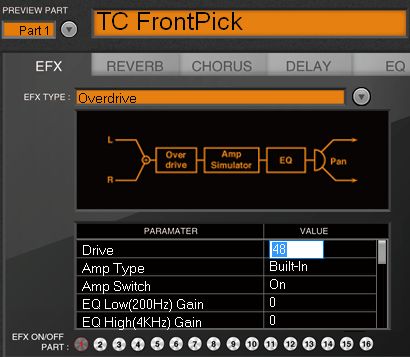
002     MILD OD             TC FrontPick                              48:GTR Multi 1
.
.
056    DUAL CHOIR       St.ChoirAahs + ChoirAahs 2  21:Stereo Delay
.
061    ANALOG BRS      JUNO Brass + P5 Brass             03:Enhancer
.
090    ASIAN DREAM   Gu Zheng + Fantasia                 24:4 Tap Delay

On the JV front, a Patch can consist of up to 4 Tones + MFX (which is the same thing as Insertion Effect), creating all those incredible but familiar Roland JV sounds. A main complaint you hear quite often on the Sound Canvas concerns with its thin sounding instruments in comparison to the JV/XP series.

Single (basic) vs layered (multiple) sound comparison

The main reason for this was because each Sound Canvas instrument consists of only the basic sound block of Tones for each Part (or midi channel) whereas the JV implements Patch selection per Part. On your JV synth, try this:
1) Select one of your favourite Patch
2) Turn off all its effects (MFX, Chorus & Reverb)
3) Turn off all but leave only one (of the four) Tones ON

Does it sound more like a Sound Canvas now? Exactly! Therefore we can conclude that the basic sound block of Tones (or internal PCM samples) on the SC & JV are quite similar, sonically speaking. It is when you start to combine many Tones immersed in reverb+other effects that the end result will sound absolutely stunning!

Actually it was a deliberate decision by Roland to maintain a tone level part for the SC for two reasons:
1) To keep the cost of the SC unit affordable which was mainly for amateurs & desktop musicians
2) The SC unit was meant to be used as a multi-timbral device – with proper sequencing & arrangement, the playback using multiple parts actually sounded quite good!

How to create a JV Patch on higher end SC modules

On the SC-88 Pro or SC-8850, you will need to set a few Part Channels to a common midi channel, for example set Parts A01, A02, A03 & A04 to receive on the same midi channel A01. This way, you will trigger all four parts with a single midi Note On via channel A01. Modify different instruments (a.k.a Tones) on each of the four Parts to your heart’s delight & add an Insertion Effect plus lots of reverb to emulate a JV sound!

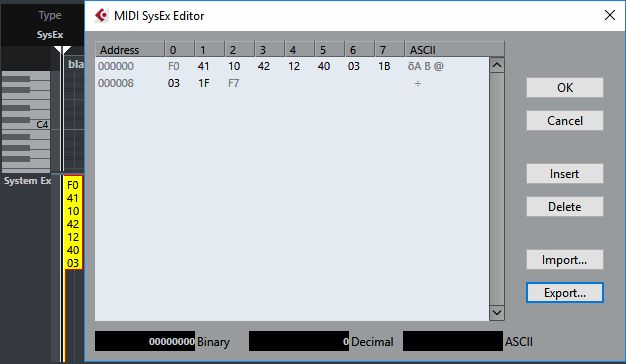
Your SC hardware will now sound different (& better?) but this will be at the expense of a reduction in parts & polyphonic count. While you won’t be able to store this 4 Tones as a user Patch, you can still do it through a transmission of Bulk Dump Part-A from the front panel of your SC & name the saved SysEx data accordingly as your Patch.

Roland Sampled Generation of the 1990’s

In terms of the number of stock Tones for comparison between the SC VA & JV-1080, there are 1493 & 1083 respectively. Over the following years after the launch of JV-1080, Roland also released almost two dozen SR-JV80 Expansion Boards for the JV/XP synths with new set of Patches & Waveforms.

SR-JV80 expansion board

As you know the SC VA plug-in was based on the original SC-8820 hardware which came out half a decade after JV-1080. Hence you may notice a few of the newer Tones on the SC VA/SC-8820 were derived from some of these updated JV expansion waveforms 🙂

How to create a JV Patch on the SC VA

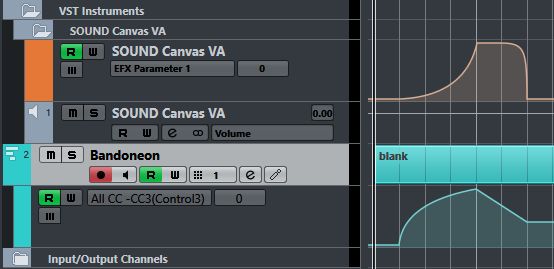
Now you’ll need a slightly different approach to do it since there is no access to change the midi channel for each part directly from the front panel, other doing some back-end SysEx programming which is too complex to discuss here. The alternative but easier way is with the help of using a DAW like Cubase – any of the Elements, Artist or Pro version will do. Open any number of midi tracks (with their own individual channels) linked to an SC VA as a rack or track instrument. Now highlight, let’s say 6 midi tracks as shown below:

Cubase setup for JV patch playback

Even though the SC VA has each Part assigned on different midi channels, the multiple track selection on the Track List of the Project Window will result in the external midi controller triggering on all 6 midi channels simultaneously, hence emulating a thick JV Patch like instrument. Notice for the Patch created below, all the 6 Tones have their Insertion Effect (red EFX buttons) turned on:

OrcheStrHorn JV patch

Indeed once the Patch is created, embellish it with the necessary EFX, reverb, chorus & delay effects. You may save the preset & give it a name. You can see that I named the Patch as “OrcheStringHorn” which is a stored preset within Cubase & can be recalled from the miniturised top menu of the encapsulated VSTi window.

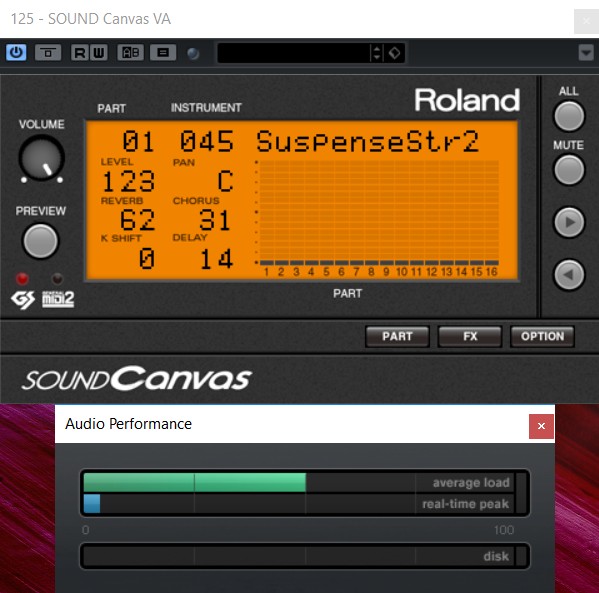
Let us assume you had created another Patch which consists of 3 Tones and named it NylonSteele. On the visual programming side of your SC VA, make sure you turn off or Mute those unused Parts. You will be using or trigger only the first 3 Tones, so you can Mute the rest of the plug-in Parts. Only Parts 1, 2 & 3 are active now as shown by the three single bars at the bottom of the main orange display panel.

NylonSteele JV patch

This way, it will be easy for you to ‘audition’ each different Patch by loading a stored preset into the VSTi while maintaining (i.e without the need to reduce or increase) the highlighted number track selection on the Project Window. On my first Patch example, I used 6 Tones which means that my stored Patch can have any number of Tones from 1 to 6. All will be good as long as the number of active (non-muted) Tones of your Patch is not more than this highlighted Tracks (6) on Cubase.

In fact, you will realise that one unit of SC VA can potentially become more powerful than the JV-1080 as it can support up to 16 Tones (instead of 4 on the JV) per Patch. Since each Tone may use either 1 or 2 voices, the 64 voice polyphonic per SC VA plug-in will be reduced down to 2…..but the 16 tones (all on 2 voices) in unison will sound something totally out of this world!

Taking this to the next level, imagine opening up 16 instances of SC VA on your DAW and each plug-in assigned to a particular Patch with its own EFX. In the past, a similar set up would have cost you an arm & a leg: 16 units of SC-8820 + a professional 16 port MIDI patchbay + a mixer with 16 input ports. Today you can load up the whole thing from a single average computer…….

For beginners who wants to attempt on this SC VA patch editing, I highly recommend that you start off by combining only 2 different Tones to get a totally new sound. Be generous with the effects add-on to spice up your instrument. Once you get comfortable with the process, you may gradually increase the number of Tones per Patch. This is when the permutation of possibilities (tones + effects combi) can be endless as you’ll continue to discover & create new patches in this so called uncharted territories within the Sound Canvas Rom*!

* well under 32 Megabytes in size

The Behemoth Template

Most of the popular Sound Canvas units like the SC-55 Mk 2, -88, -88 Pro & -8850 come with easy access front knobs & a display panel for sound selection & patch editing. The SC-8820 module on the other hand had to rely on the accompanied software to achieve the same result through a computer. Even though the SC VA’s friendly graphical interface is one step up compared to the faceless SC-8820, it can never replace the convenience of knobs & quick buttons from the other Sound Canvas models.

Tone List

One of the major gripe with the SC VA is its poor design interface when attempting to audition the Tone List which are separated by three columns: Map, Category & Name. Up to three mouse clicks plus a vertical mouse scroll (for the Name column) are required before you can access any of the 1600 instruments! Your computer keyboard (e.g the arrow keys) unfortunately does not work in this case.

For composers, this is totally unacceptable as the fastest means to reach for our choice of instrument shouldn’t be too complicated when using the SC VA so that we can hit the record button immediately while the creative juice is still flowing……

So I had found a way around this by creating a massive project template on Cubase Pro – sorry this would not work on Artist or Elements due to the inherent limitation of midi & instrument tracks on these trimmed down versions.

It took me many weeks (I kid you not!!!) to complete the final Behemoth template with this grand specs:

1552 midi tracks (grouped within 17* folders): 1493 Tones + 59 Drumset
97 instances of SC-VA plug-ins (on 97 additional Instrument tracks)

* 16 Category of Tones (Piano, Chromatic Perc, Organ, …. SFX) + 1 Drumset folders

Hence every instrument will load up in its correct sequence as per the assigned midi track. By scrolling to a different midi track on the main Cubase page on a mouse click or with the computer keyboard, the user is able to audition the sound quickly!

track1

Using this template on a new project, I have fast access to every sound from ALL the SC Instrument maps without having to ever open the cumbersome Tone List from the individual plug-ins. During the creation of this template, all of the instruments were selected manually through the Tone List for each part & from each plug-in.

Zoom in

Then a midi track with the appropriate given name is linked to the respective part & channel of the plug-in. I use this standard convention label on the name: xx yy <original tone name> where xx is the SC VA plug-in number & yy is to indicate the instrument map (82 = 8820, 8p = 88pro, etc).

In the screenshot above, I opened the Organ folder & the midi track #133 has been selected with the name “09 8p Organ 1”. This is the original Organ 1 tone from the SC-88 Pro map. I am able to hear the sound by playing on the midi keyboard which will trigger the 9th SC VA plug-in. To audition the next sound, just use the down arrow button to go to the next midi track. Since the midi track & the correct instrument setup are already there, I only need to hit the Num * key (Cubase standard shortcut) to begin recording on that particular track.

track2

Essentially, the user can now open the appropriate patch folder which is associated to the SC tone category with ease and dive into each midi track till he/she finds the right instrument. This can be done quite comfortably even on a small screen laptop.

mixer1

Notice that all the different SC maps have been combined & grouped within the Tone Category folder, so one less hurdle here. In fact this increases the workflow efficiency as whatever instrument that fits the song is what matters most to the songwriter.

mixer2

Some of you may wonder why I had less than 1600 midi tracks even though the advertised SC VA claims to have 1600 tones in total? The reason for this was due to the many duplicated instruments across the SC Maps.

ScreenHunter_586 May. 15 13.28

Using the same example on the Organ group, you’ll find that “Organ 1” for SC-8820 Map is a duplicate from 88 Pro Map, therefore what remains are Organ 1 (8p), Organ 1 (88) & Organ 1 (55). Likewise for “Organ 101” as seen on the list, there are only two unique Tones namely from the 88 Pro & 88 Maps.

Actually there’s a total of 1483 unique instruments within the SC VA. Similarly there are 59 unique drumset after discounting all of the duplicates. Since 1483 + 59 = 1542, why did I create 1552 midi tracks? This has to do with the 16 midi parts per SC VA instance: 16 x 97 = 1552. Therefore there is a balance of 10 unused or reserved midi tracks which one can assign to other normal tones or drumset part.

Now here are some of the disadvantages when using the Behemoth template:

  1. This blank template (i.e without any song inside) is almost 70MB in size!
  2. It will require a reasonable performance laptop – Core i5 processor or better
  3. It will take almost 4 mins to load up all 97 plug-ins on a non-SSD computer
  4. Will only work on 64 bit Windows (7 & above) with at least 6GB RAM

At idle state, the average load CPU usage for my older i7 laptop seems to hover beyond the 50% mark but on my recent i5 laptop with 12GB RAM it stayed around 35%.

On a side note, I tried to open this template on a friend’s Core i3 computer with 4GB RAM. After 45 mins, it was still loading, probably went into an infinity loop, so we aborted the whole thing.

I hope that by sharing the above tip, you’ll be able to create your own template to maximise the productivity of your work with the SC VA. Steinberg has indeed proven to us that their flagship Cubase Pro is very stable even with over thousand midi tracks opened while having almost 100 instrument plug-ins active!

SC VA multiple instances revisited on Cubase

Using a more recent ASUS notebook, I tried to open as many Instrument Tracks on Cubase to understand what would be a practical number of SC VA instances allowed when working on Midi-only sequencing. The computer involved was purchased last year, had a mid-range Core i5 processor and running on Windows 10. Instead of opening endless number of instrument tracks, an agreed target was to reach a realistic limit of half-way point on the Audio Performance bar for Average Load while the DAW is at idle state, i.e no playback. For this test, we will be going beyond the standard limit number of Instrument Tracks set on Cubase Elements (24) & Cubase Artists (32).

cpu at idle

As you can see from the above image, a constant 50% loading occurred when 125th Instrument Track (yes that’s one hundred and twenty five….not a typo!) was opened and active. This involved with each track linking to its own independent SC VA plugin. This means the Cubase DAW was able to handle all 125 instrument plugins at 50% utilisation of the PC’s processor, all of which are ready to be triggered by any midi events in realtime!

While these 125 instruments are still active, I tried to import a typical multitimbral midi file on the same Cubase project to observe the increase in the Average Load bar during playback. Two playback variations were attempted:

  1. Routing all of the song’s MIDI parts into one single (i.e same) SC VA plugin
  2. Routing each MIDI part to a different instrument track, hence multiple SC VA plugins are triggered during the playback

cpu with playback

Well both variations seemed to produce a similar increase in the performance loading of around +3%. This result was quite surprising to say the least! While it has always been assumed that with more plugin instances, more CPU resources are used up. However the increase in the CPU usage in this case was relatively small during both type of MIDI playback.

A combination of 16 MIDI tracks per plug-in multiply by 125 instruments tracks would result in a potential total of 2000 multi-timbral MIDI tracks (and up to 250 of them can be assigned as full Drum tracks) for this SC VA setup! Max polyphony in this case = 125 x 64 = 8000 notes.

Now assuming you will not use more than 125 midi tracks, then you can assign each with its own Insertion Effect, meaning you will have a total of 125 insertion effects. When applied to the Cubase mixer, each of these 125 channels will have further opportunity to be processed by other better VST effect plug-ins.

On Roland’s official website, they mentioned that it can take up to 15 seconds to load up each of SC VA plug-in, therefore in one minute at least 4 plug-ins will be ready for use. This timing by the manufacturer seemed extremely conservative.

Using a stopwatch, it was observed that 35 SC VA instances could be opened on my Cubase within 60 seconds – which means it took less than 2 seconds to open each of Roland’s plug-in. And mind you…….this was on a standard notebook using a normal hard (non-SSD) drive!

It can be safely concluded a Cubase user should be able to sequence a complex piece of MIDI arrangement on an average home computer using over 100 SC VA plug-ins with no performance issue. As for the Elements or Artist versions, your DAW system should be able to handle the SC VA plug ins with ease up to their own max number of instrument tracks without exceeding the CPU overhead.

Subscription based Sound Canvas plug-in?

ScreenHunter_465 May. 14 17.40

Yes, you heard that right! Roland has tied up with Virtual Sonics to offer Roland Cloud. At the moment, they want you to sign up for their 30 days Beta Trial without the need to provide your credit card details. After that the early birds will continue to enjoy membership privileges on a $19.95 per month.

The good news with this alternative approach is that it allows us a low cost access to try out Roland’s growing VST plug-in library on an affordable monthly basis. The license of their instruments library will continue to be valid with each month’s subscription renewal. Roland have also planned Cloud Subscription ($29.95/month) and Storm Subscription ($39.95/month) without revealing too much detail at the moment.

People used to complain the standalone Sound Canvas VA plug-in downloadable from Roland website as being expensive. It seems that the original $125 price has yet to come down. This makes the $19.95 per month an attractive proposition because not only will you get the SC-VA but also many other plug-ins!

Once you have registered an account, from the Roland Cloud website go to Instruments > Legendary > Sound Canvas VA. Click on Download then choose either the MacOS or Windows installer. In the meantime you can also download & read the Authentication Guide. Note that the installation will fail if it detects your system already has a standalone copy of SC-VA.

According to the Attention Read Me Guide, it is recommended that you keep using any standalone version instead of uninstalling them. The rationale behind this is that the standalone version will never expire, so in the event that you decide to cancel your subscription plan, those single licensed plug-ins will not be affected.

I did have a go on with their beta trial account on a separate computer and after successfully installing & launching the SC-VA on a hosted application, I clicked on the plug-in’s Option > About. This is the screenshot:

ScreenHunter_466 May. 14 17.42

This time the ‘trial’ SC-VA is fully operational without limitations unlike the unregistered standalone version (which has a 10 minute usable time limit, requiring a restart & will no longer produce any sound after 14 days).

Assuming you decide to continue with the subscription for one year, you would have to fork out a total of $220 during the next 11 months. This is a lot more than the $125 standalone version although as mentioned earlier this higher cost will give you access to the rest of the instruments in the Roland Cloud library.


Apart from that both versions of SC-VA when tested are identical in their sounds. The only annoying aspect with using the cloud based plug-in is that your computer needs to be connected to the internet because their plug-ins will have to be authenticated with the cloud server each time they are opened. Apparently Roland may relax this requirement in the future but for now, their plug-ins will not start if your computer is off line.

According to their Support page, this SC-VA is only compatible with one DAW, the Steinberg Cubase 8.5. I did an extensive testing (including sysex) on Cubase Elements 8 which worked out fine too. Not sure why they dropped the support for the older Cubase 7 series? The once popular MOTU’s Performer 9 is also no longer on the list of supported host applications

Supported host applications for Sound Canvas VA

Currently there are only a handful of DAWs which fully support the SC-VA:

Windows 7 SP 1 / Windows 8 / Windows 8.1 / Windows 10

  • Internet Ability series (32 bit version / 64 bit version)
  • Internet Singer Song Writer 9 Lite (32 bit version)
  • Steinberg Cubase 8 series (32 bit version / 64 bit version)
  • Steinberg Cubase 7 series (32 bit version / 64 bit version)

Mac OS X 10.8.5 or later / OS X 10.9 / OS X 10.10

  • MOTU Digital Performer 9 * AU version only
    (up to version 9.0.2, it is not avail in version 9.1.2)
  • Steinberg Cubase 8 series (64 bit version)
  • Steinberg Cubase 7 series (64 bit version)

[Note: This above was copied from Roland’s latest list dated 23rd March 2017]

Assuming that the SC-VA is your primary VST instrument(s), stick to any of the above host applications if you want true stability, full system exclusive access and plug-in compatibility.

Their R&D team have yet to come forward with the result of their testing on Steinberg’s newest Cubase 9 series, so I will not comment on this for now. On the Windows front, only Cubase 7 and 8 series are still the main ones which are fully supported & recognized by our mainstream musicians.

Japanese DAWs: ABILITY & SSE for Windows

Japanese consumers do have an alternative option from their local software company called Internet Co Ltd which have been making audio/music sequencer for a long time, but mainly in Japanese language. Their flagship ABILITY (now at version 2.0) software is somewhat equivalent to our well known Cubase. For those with a budget constraint, they offer Singer Song Writer (SSW) Lite which is a DAW with reduced features. Here’s a brief comparison between the two:

Ability 2.0 Pro (¥36,000 or approx $320)

  • Audio format up to 24 bits / 192 kHz
  • Max number of VST instruments: 64
  • Max number of Audio tracks: Unlimited
  • Max number of MIDI tracks: 256

Singer Song Writer Lite 9.5 (¥9,800 or approx $90)

  • Audio format up to 24 bits / 96 kHz
  • Max number of VST instruments: 8
  • Max number of Audio tracks: 8
  • Max number of MIDI tracks: 32

On the Mac side, the Cubase 7 & 8 series are still the proven DAWs to work properly with all the features of Sound Canvas VA. This next advise may seemed counter-intuitive but users of Marks Of The Unicorn’s Performer 9 need to be aware that the SC-VA has an issue when running on Performer version 9.1.2. Accordingly, if you are still on version 9.0.2 or earlier, you should not update your DAW until Roland can fully resolve this compatibility problem through a new patch or update.

Software bugs & updates on Sound Canvas VA

I managed to get the latest official changelogs for the Sound Canvas VA from Roland Japan, so here I’m sharing them with you:

Ver.1.02
– Fixed the bug of not able to save the sound when in a DAW.
– Fixed the bug of not able to playback with correct sound map with certain data.

Ver.1.05
– Fixed the bug of some EFX going abnormal.
– Fixed the bug of System Effect “Delay”.
– Fixed the bug of EFX screen value displaying.
– Fixed the bug of GM/GM2 mode screen displaying and also the behavior
– Fixed the bug of Drum2 Part setting.
– Fixed the bug of display going scrambled on some DAWs.
– Fixed other minor bugs.

Well I had brought up the annoying bug of Drum2 Part setting. In the older version, the bug prevents a drum part 10 to be changed to another permanent location from the user front panel. So for instance if you move this to part 1, that part 1 will revert back to a non-drum instrument when you restart the plugin. While it will still sound correct during the sequencer’s playback, the issue has to do with the display interface. So thumbs up to Roland on this one as the bug has been fixed!

If you go through all of SC-VA plugin’s graphical interface, you can literally access & tweak almost all of their parameters visually with your computer mouse/track pad without the need to program in sysex as what the SC-8820 users do in those good old days. As you know the SC hardware module did not have a front display or edit buttons, so desktop musicians then need to connect it to a computer and use a Sound Canvas software (sysex) editor to tweak the parameters on their computer screen.

EFX Control Switches

Having fixed all of the above bugs, what remains (yes, I’m still waiting) is the unavailability of the four EFX Control Switches (Source1, Depth1, Source2, Depth2) for the Insertion Effects manipulation. These are still missing even on the latest version of the SC plug-in – I suspect such a modification may require a redesign of their user interface to add these missing switches.

On the SC-88Pro, you can access the EFX Control Switches by:
1) Press [ALL] to make the button indicator light
2) Simultaneously press PART [l] and [r]
3) Press either [u] or [d] to select the parameter whose setting you wish to change
4) Use INSTRUMENT [l][r] to set the value
5) When you finish making the settings, simultaneously press PART [l] and [r] to end the procedure

ScreenHunter_464 May. 13 17.38

ScreenHunter_463 May. 13 17.30

On the SC-8850, the setup procedure is as follows:
1) Press [EFFECTS] to turn it on
2) Press [F4] to scroll the screen and press [CTRL]([F3])
3) Press VAR[d] or INST[u] to move the cursor up and down, and select the parameter you want to modify
4) Rotate the [VALUE] knob, or press [DEC] or [INC] to set the value for the parameter
5) When you finish making settings, press [EXIT] to end the procedure

ScreenHunter_462 May. 13 17.25

ScreenHunter_461 May. 13 17.25

But it probably won’t happen as their R&D department were quite adamant in their reply that these 4 parameters can only be accessed (unfortunately!) through sysex since the SC-VA’s internals is an emulation of the SC-8820 module, and this can only be commanded externally via midi.

The fact is everything on the SC hardwares (and the SC-VA plug-in) today are fully controllable using sysex messages, which means that Roland goofed up (i.e they forgot to include these four switches) when initially creating the SC-VA layout. To me this is inexcusable as we’re now more than two decades into the future since the Sound Canvas series became popular.

Just to give you an idea on how much we have to continue using the sysex due to the missing 4 switches on the VSTi panel, there are 5 examples below which I’ve highlighted in yellow for the required manual inserts of sysex:

ScreenHunter_456 May. 13 17.21ScreenHunter_457 May. 13 17.21ScreenHunter_458 May. 13 17.22ScreenHunter_459 May. 13 17.22ScreenHunter_460 May. 13 17.23

In summary, steps 1 to 3 can be accessed from the SC plug-in’s front panel, hence no need for sysex. We only need sysex for steps 4 to 5, which can be a real pain for the uninitiated, e.g new musicians in the future.

I suppose at the end of the day, we have to ask ourselves: Are we supposed to still rely on aging sysex on our preferred DAW when most of the instrument parameters can be modified visually on the VSTi & stored as part of a song project? And the trend shows that major DAW developers (with the exception of a few like Steinberg, MOTU, etc) are gradually dropping the once must have sysex functions in place of VSTi direct sound editing.

It just seemed to me that the original intention of coming out with this VSTi plug-in (the SC-VA) was to ensure the continuity and survival of the Roland Sound Canvas into the next decade. However the fact that we need to still apply sysex is actually taking 2 steps backward since this means that not all of the plug-in’s full features will be available on most of the current DAWs (I will cover the list of compatible DAWs in the next post).

It’ll probably be more cost effective to correct this with a one time fix (a software update) of the plug-in which will then address all the issues mentioned above. The long list of incompatible DAWs can be reduced, resulting in a win-win for end users and the manufacturer.

Let’s hope Roland is reading this.

Sound Canvas museum galore

Rekindle old memories from these dazzling past generation SC family photos obtained from various parts of the world (Japan, Thailand, etc). Let us now walk through this museum collection of Sound Canvas.

SC-D70 quad

The SC-D70 was the first ever hardware Sound Canvas with built-in digital in & out ports (selectable 44.1 or 48 kHz).

sc-8850 trios

The legendary SC-8850, a full fledged sound module with 64 parts & 1640 tones.

sc-88pro 3 by 5

The ever so popular (at least in Japan!) SC-88Pro which comes with insertion EFX creating more realism & new soundscape possibilities.

sc-88pro 10 units grouped

The 128 Preset Patch (plus 16 User Patch) which are multi-combi Tones can literally turn this Sound Canvas into a JV series synth for live performance.

sc-88pro 2 by 6

Back then this best selling SC-88Pro also became the de-facto standard midi instrument template for many modern karaoke system in Japan.

SC-880

For professional gig & studio setup, Roland came out with the rackmount version called SC-880 which has identical specs as the SC-88Pro.

SC-88VL 2 by 5

The SC-88VL came out after the SC-88 as a more compact (1U height) version.

SC-88VL 4 units

Otherwise it has the same internal specs as the SC-88 in a smaller package.

SC-88VL 5 by 2

The similar physical footprint of the 88VL means it has the same height as the SC-55.

SC-88 duo

SC-88 was the first sound canvas offering 32 parts (previously only 16 parts), higher number of tones (354 to 645) and massive increase to 22 drum sets (previously 9). The voices also increased from 32 to 64, making this standalone device a self sufficient module.

SC-55 mk II classic 4 units

SC-55mkII is the improved Sound Canvas from the original SC-55. It comes with 28 voices.

SC-55 mk II 3 by 5

It’s quite common to see a stack of two or more SC-55 to ensure there is adequate polyphony for playback.

SC-55ST thirteen

Another variation of the Sound Canvas is the SC-55K for the Japanese market.

SK-55K 6 units

Each of the module has two mic inputs at the front (with vocal effects) which serves as a perfect MIDI karaoke set-box. Of course the device needs to be connected to an external sequencer or computer for playback.


SC combination

multiple sc-88 stacked

SK-88pro trio

SK-88Pro is the keyboard version of the SC-88Pro.

SK-88pro multiple

As mentioned earlier, the built-in Preset Patch as well as the User Patch allows the SK-88Pro to produce JV-like sounds during live performance.

JV-30 dual

JV-30 internal sounds were based on the classic Sound Canvas tones.

JV-30

It supports the standard 16 part multi-timbral.

SK-50IV black

SK-50IV is a Sound Canvas SC-50 with a keyboard (standard 61 keys) & built-in stereo speakers.

SK-50IV

It comes in two colours: Black or White.

SC-155 sequencer

SC-155 is a tabletop version of SC-55.

SD-35 floppy

SD-35 is a 16 channel midi sequencer and a trimmed down version of Sound Canvas (SC-50) combined into one. Songs can be saved and loaded on a 3.5 inch floppy disks.

SB-55 with SC-55

The top is the classic SC-55 while the bottom is the Sound Brush player/recorder.

SC-55 ST dual

The SC-55ST is a cheaper version of SC-55mkII and is an ideal expansion unit for those who required multiple sound canvas modules due to limited polyphony and/or parts.

SC-55ST stacked

The SC-55ST also comes in the standard dark colour blending with other SC family. Since the front panel is quite bare, you would need a computer & the accompanied software to edit & set up the tone/parts.

SC-7

The most basic and cheapest GM external module (not GS compatible) by Roland using the original sound canvas tones. It has similar output resolution as the SC-55 which is 16-bit @ 32 kHz  which is great during its time.

PMA-5

PMA-5 is Roland’s Personal Music Assistant which is portable music writing device capable of running on battery or an external power. It has a built in sequencer using the stylus touch screen & GS compatible sounds for composing your own music.

Sk-500 keyboard

This SK-500 is an SC-8820 which comes with a 49-key MIDI keyboard design.

SC-8820 solo

And finally the silver unit (Roland Edirol SC-8820) shown here, is what has evolved into the Sound Canvas VA plug-in that we know of today.

Sound Canvas for iOS on 6th gen iPod Touch

When you mention the word iOS, the image that will be conjured up in people’s mind is either the iPhone or iPad. However another not so well known device by Apple called the iPod Touch also runs on the same iOS platform. The 6th generation iPod Touch with a 4-inch screen was released in mid-2015. It is a 64-bit device using Apple A8, the same processor found in the iPhone 6.

SC For iOS

The most basic 16GB version is currently selling for USD 199 making it the cheapest iOS device to run the Sound Canvas for iOS app. Unfortunately the app would not work on its 32-bit predecessor, the iPod Touch 5th gen as it was specifically made to run only on a 64-bit hardware.

Apart from having the same sound engine as SC-8820 (as with the Sound Canvas VA), one additional feature which is mostly appreciated by users is the integrated midi player with full support of system exclusive data. So the playback from existing GS2 midi files would correctly configure the SC exactly as per what you would hear on the hardware equivalent.

Overall the Sound Canvas emulation on the iOS works great. It is a lightweight sound module+player which you can now afford to carry in your pocket. The updated App version 1.2.0 now supports the latest iOS 9.

If you want to hear some amazing midi arrangements for the Sound Canvas, test out a few midi songs from this site. All of Roland’s original demo midi which came along with the SC-88Pro, SC-8820 and SC-8850 can be found here. Many of these midi files utilise sysex, and would also playback correctly on the Sound Canvas VA as long as you’re running a fully compatible host application such as the latest Cubase DAW.